TL;DR: המאמר הזה מסביר מה זה domain gateway, איך לבנות אחד ולמה תרצו אותו.
מה זה Domain Gateway?
domain gateway הוא מקרה פרטי של ה-API gateway pattern. האתר java-design-patterns מגדיר את ה-gateway pattern כך:
With the Microservices pattern, a client may need data from multiple different microservices. If the client called each microservice directly, that could contribute to longer load times, since the client would have to make a network request for each microservice called. Moreover, having the client call each microservice directly ties the client to that microservice – if the internal implementations of the microservices change (for example, if two microservices are combined sometime in the future) or if the location (host and port) of a microservice changes, then every client that makes use of those microservices must be updated. The intent of the API Gateway pattern is to alleviate some of these issues. In the API Gateway pattern, an additional entity (the API Gateway) is placed between the client and the microservices. The job of the API Gateway is to aggregate the calls to the microservices. Rather than the client calling each microservice individually, the client calls the API Gateway a single time. The API Gateway then calls each of the microservices that the client needs.
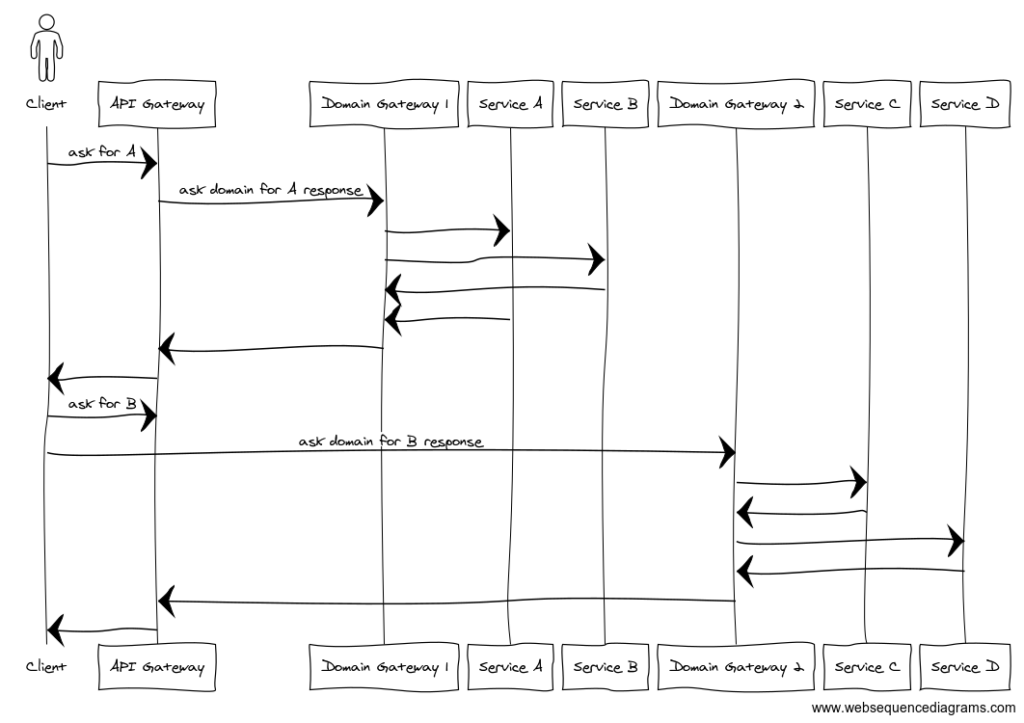
כמו API gateway, domain gateway פועל כ-facade ללקוחות. הוא מאפשר לצבור קריאות ל-backend לקריאה אחת ללקוחות. בנוסף, הוא מאפשר להחליף שירותי backend מבלי להשפיע על הלקוחות. ההמחשה הבאה מראה דוגמה אפשרית של ה-domain gateway pattern:
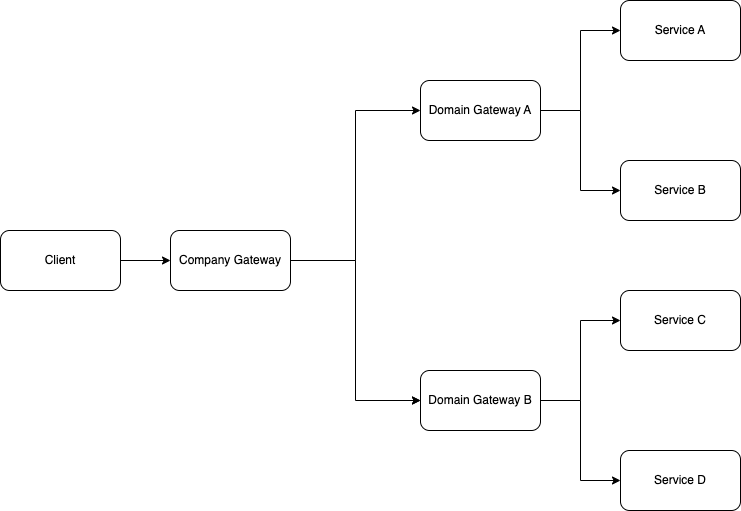
אם אתם מעדיפים class diagram, ההמחשה הזו אולי יותר הגיונית:
שימו לב ש-domain gateway לא חייב לצבור קריאות ללקוחות; הוא יכול להעביר אותן אם ה-API פשוט מספיק.
עכשיו שאנחנו מבינים איך domain gateway נראה, הנה כמה do’s ו-don’ts לה-pattern הזה.
מה עושים ב-Domain Gateway
שמרו אותו פשוט. הוא צריך לטפל ב-request proxying ו/או request aggregation אם צריך.
שמרו על גרסאות API. הוא צריך להעביר את הבקשה ל-API אחד או יותר, כל אחד עם גרסאות שונות פוטנציאלית.
ודאו שהוא קל משקל ויכול להתרחב בקלות. אם ה-domain gateway שלכם לא זמין, כל הדומיין שלכם לא יהיה זמין.
מה לא עושים ב-Domain Gateway
לא מטפלים ב-business logic. לדוגמה, משימות כמו שליחת מיילים או יצירת קבצים צריכות להתבצע על ידי שירות ייעודי, ולא על ידי ה-domain gateway.
לא מאחסנים business logic או object models במסד הנתונים. ה-domain gateway צריך להיות לגמרי stateless ולא לדעת על פרטי business logic.
שוכנעתי…
אני מקווה ששכנעתי אתכם ש-domain gateway שימושי. אם כבר קראתם את המאמר שלנו How to Use OpenApi to Build a Robust RESTful API, כנראה שאתם יודעים שאני אוהב להשתמש ב-OpenAPI specs לשירות. הבעיה שהוצגה במאמר הקודם היא: איך מייצרים הרבה specs בו-זמנית?
איך בונים Domain Gateway?

Tech Stack
נשתמש ב-tech stack הבא:
Kotlin — אחרי הכל, זה בלוג על Kotlin…
Spring Boot — נשתמש ב-Spring Boot 3, עם ציון השלבים הנדרשים ל-Spring Boot 2
Gradle Kotlin DSL — נשתמש בפתרון Gradle multi-module בדוגמה שלנו כשכל שירות יהיה module נפרד.
Retrofit — למרות ש-OpenApi generator תומך בכמה REST clients, בחרתי ללכת עם המועדף האישי שלי.
מבנה ה-Domain Gateway
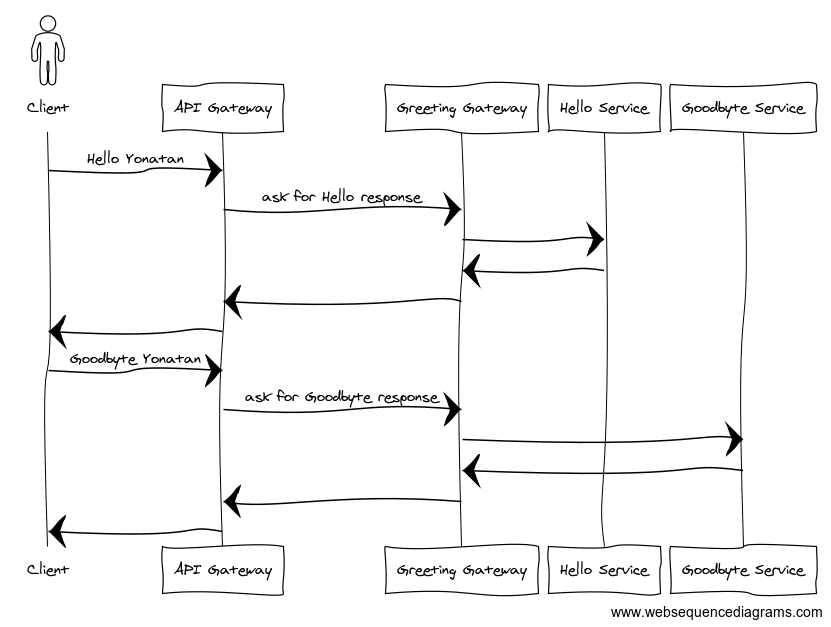
לפשטות, נניח שיש לנו רק שני שירותים בדומיין שלנו. כל שירות משרת endpoint אחד שאינו קשור לאחר. ההמחשה למטה מראה דוגמה לאיך הלקוח שלנו ישתלב עם הדומיין שלנו:
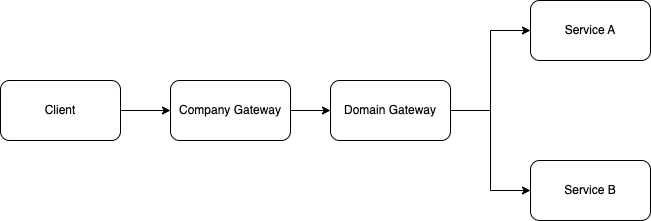
אם נסתכל על מבנה השירות של הדומיין שלנו, זה ייראה בערך כך:
API Specs
Hello Service
ה-Hello API שלנו יחשוף endpoint אחד: /hello/{name}. ה-endpoint הזה ישיב ללקוח עם “Hello ” (לדוגמה “Hello Yonatan”).
openapi: 3.0.3
info:
  title: Hello API
  description: A service greeting with Hello World
  version: 1.0.0

tags:
  - name: Hello

paths:

  /hello/{name}:
    get:
      operationId: hello
      summary: Returns hello + user name
      tags:
        - Hello
      parameters:
        - in: path
          name: name
          schema:
            type: string
          required: true
      responses:
        "200":
          description: |
              Successfully returning hello + user name to the client.
          content:
            application/json:
              schema:
                $ref: "#/components/schemas/HelloResponse"

components:
  schemas:
    HelloResponse:
      type: object
      required:
        - value
      properties:
        value:
          type: string
          example: "Hello world"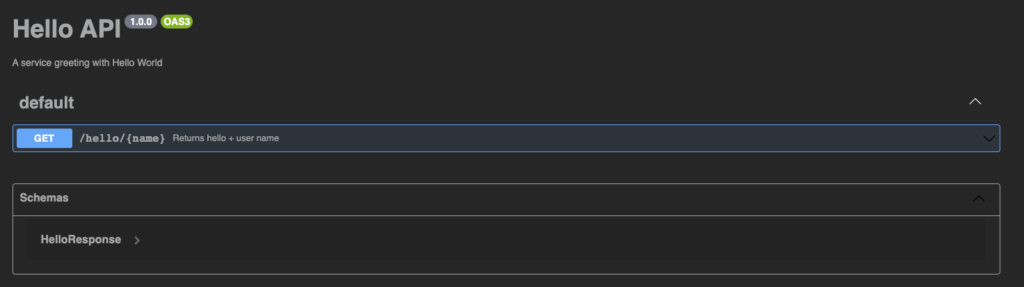
Goodbye Service
ה-Goodbye API שלנו זהה לחלוטין ל-Hello API. הוא מכיל endpoint אחד: /goodbye/{name}. ה-endpoint הזה, בדיוק כמו ה-Hello API, משיב ללקוח עם Goodbye (לדוגמה Goodbye Yonatan).
openapi: 3.0.3
info:
  title: Goodbye API
  description: A service greeting with Hello World
  version: 1.0.0

tags:
  - name: Goodbye

paths:

  /goodbye/{name}:
    get:
      operationId: goodbye
      summary: Returns goodbye + user name
      tags:
        - Goodbye
      parameters:
        - in: path
          name: name
          schema:
            type: string
          required: true
      responses:
        "200":
          description: |
              Successfully returning goodbye + name to the client.
          content:
            application/json:
              schema:
                $ref: "#/components/schemas/GoodbyeResponse"

components:
  schemas:
    GoodbyeResponse:
      type: object
      required:
        - value
      properties:
        value:
          type: string
          example: "Goodbye world"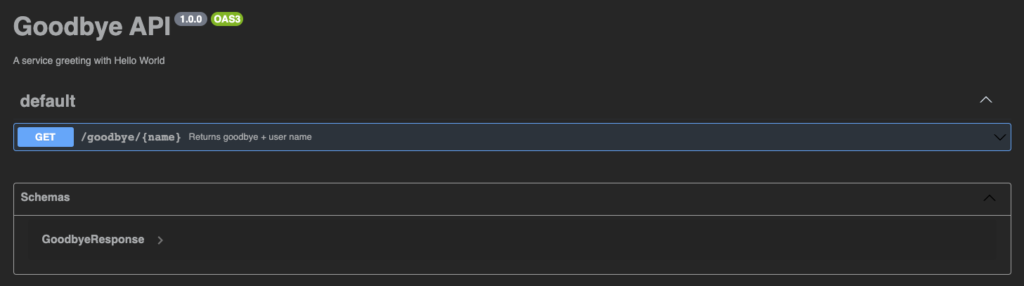
Domain Gateway Service
ה-greeting API פועל כ-facade לשני השירותים למעלה. הוא כולל שני API endpoints:
/hello/{name}/goodbye/{name}
openapi: 3.0.3
info:
  title: Gateway API
  description: A service greets the user
  version: 1.0.0

tags:
  - name: Gateway

paths:

  /hello/{name}:
    get:
      operationId: hello
      summary: Returns hello + user name
      tags:
        - Gateway
      parameters:
        - in: path
          name: name
          schema:
            type: string
          required: true
      responses:
        "200":
          description: |
              Successfully returning hello + user name to the client.
          content:
            application/json:
              schema:
                $ref: "#/components/schemas/HelloResponse"

  /goodbye/{name}:
    get:
      operationId: goodbye
      summary: Returns goodbye + user name
      tags:
        - Gateway
      parameters:
        - in: path
          name: name
          schema:
            type: string
          required: true
      responses:
        "200":
          description: |
              Successfully returning goodbye + name to the client.
          content:
            application/json:
              schema:
                $ref: "#/components/schemas/GoodbyeResponse"

components:
  schemas:
    HelloResponse:
      type: object
      required:
        - value
      properties:
        value:
          type: string
          example: "Hello world"

    GoodbyeResponse:
      type: object
      required:
        - value
      properties:
        value:
          type: string
          example: "Goodbye world"
ייצור כמה Specs
נמקם את כל ה-specs למעלה בתיקיית /resource/api שלנו עם השמות הבאים:
hello-api.yamlgoodbye-api.yamlgateway-api.yaml
נעשה שימוש חוזר באותה הגדרה שהשתמשנו בה במאמר הקודם. עם זאת, נרצה לתקן אותה כדי שנוכל לייצר מספר בלתי מוגבל של specs. אם צריכים הסבר על איך לקנפג את ה-OpenAPI Gradle plugin, עיינו במאמר הקודם שלנו.
השלב הראשון הוא להכניס קלאס חדש לתסריט ה-build של Gradle שלנו. הקלאס הזה יחזיק את כל המידע הנדרש על ה-spec.
/**
 * A class represents a specific spec to generate.
 */
data class ApiSpec(
    val name: String,
    val taskName: String,
    val directoryPath: String,
    val outputDir: String,
    val specFileName: String,
    val generatorType: String,
    val packageName: String,
    val modelPackageName: String,
    val config: Map,
    val templateDir: String? = null
)
עכשיו ניצור רשימה של כל ה-specs שרוצים לייצר ב-build.gradle.kts שלנו:
/**
 * List of all api specs to generate
 */
val supportedApis = listOf(
    ApiSpec(
        name = "Gateway API",
        taskName = "generateGatewayApi",
        directoryPath = apiDirectoryPath,
        templateDir = "$apiDirectoryPath/templates/kotlin-spring",
        outputDir = "$openApiGenerateOutputDir/domain-gateway",
        specFileName = "gateway-api.yaml",
        generatorType = "kotlin-spring",
        packageName = "com.yonatankarp.gateway.openapi.v1",
        modelPackageName = "com.yonatankarp.gateway.openapi.v1.models",
        config = mapOf(
            "dateLibrary" to "java8",
            "interfaceOnly" to "true",
            "implicitHeaders" to "true",
            "hideGenerationTimestamp" to "true",
            "useTags" to "true",
            "documentationProvider" to "none",
            "reactive" to "true",
            "useSpringBoot3" to "true",
        )
    ),
    ApiSpec(
        name = "Hello API",
        taskName = "generateHelloApi",
        directoryPath = apiDirectoryPath,
        outputDir = "$openApiGenerateOutputDir/domain-gateway",
        specFileName = "hello-api.yaml",
        generatorType = "kotlin",
        packageName = "com.yonatankarp.hello.openapi.v1_current",
        modelPackageName = "com.yonatankarp.hello.openapi.v1_current.models",
        config = mapOf(
            "dateLibrary" to "java8",
            "interfaceOnly" to "true",
            "implicitHeaders" to "true",
            "hideGenerationTimestamp" to "true",
            "useTags" to "true",
            "documentationProvider" to "none",
            "serializationLibrary" to "jackson",
            "useCoroutines" to "true",
            "library" to "jvm-retrofit2"
        )
    ),
    ApiSpec(
        name = "Goodbye API",
        taskName = "generateGoodbyeApi",
        directoryPath = apiDirectoryPath,
        outputDir = "$openApiGenerateOutputDir/domain-gateway",
        specFileName = "goodbye-api.yaml",
        generatorType = "kotlin",
        packageName = "com.yonatankarp.goodbye.openapi.v1_current",
        modelPackageName = "com.yonatankarp.goodbye.openapi.v1_current.models",
        config = mapOf(
            "dateLibrary" to "java8",
            "interfaceOnly" to "true",
            "implicitHeaders" to "true",
            "hideGenerationTimestamp" to "true",
            "useTags" to "true",
            "documentationProvider" to "none",
            "serializationLibrary" to "jackson",
            "useCoroutines" to "true",
            "library" to "jvm-retrofit2"
        )
    )
)
ℹ️ למשתמשי SpringBoot 2, ודאו להסיר את ה-flag useSpringBoot3 מה-Gateway API לחלוטין, כי ה-generator מתעלם מהערך ב-map ובודק רק אם ה-flag קיים.
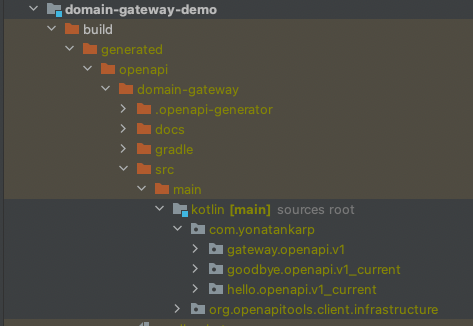
אולי תשימו לב שכל ה-specs שלנו מיוצרים לאותה תיקיית output. זה בגלל ש-OpenAPI מייצר כמה קלאסים של infrastructure שהקוד שנוצר משתמש בהם. אם לא מייצרים אותם לאותה תיקיה, ה-sourceDir יכלול כפילויות של קלאסים באותן packages, והקוד לא יקומפל. אפשר לראות שאנחנו עדיין מפרידים את ה-APIs שלנו לפי שם package בקוד שנוצר:
הוספת הקוד שנוצר לפרויקט
השלב הבא הוא הגדרת כמה פונקציות גנריות שיעשו את הדברים הבאים:
ירשמו task חדש לכל spec כדי לייצר את הקוד.
יוסיפו את הקוד שנוצר ל-source set.
יוודאו ש-task ה-
cleanמסתיים על ידי task הייצור של ה-spec.יגרמו ל-
compileKotlinלהיות תלוי ב-task הייצור של ה-spec.
נתחיל ביצירת tasks לכל ה-specs שלנו תחת קבוצת openapi tools:
// Iterate over the API list and register them as generator tasks
supportedApis.forEach { api ->
    tasks.create(api.taskName, GenerateOpenApiTask::class) {
        group = "openapi tools"
        description = "Generate the code for ${api.name}"

        generatorName.set(api.generatorType)
        inputSpec.set("${api.directoryPath}/${api.specFileName}")
        outputDir.set(api.outputDir)
        apiPackage.set(api.packageName)
        modelPackage.set(api.modelPackageName)
        configOptions.set(api.config)
        api.templateDir?.let { this.templateDir.set(it) }
    }
}
השלב הבא הוא הוספת הקוד שנוצר מה-tasks הקודמים ל-sourceSet שלנו. אנחנו משתמשים באלמנט הראשון ברשימה כיוון שכל הקבצים שלנו מיוצרים לאותה תיקיית output.
supportedApis.first().let {
    sourceSets[SourceSet.MAIN_SOURCE_SET_NAME].java {
        srcDir("${it.outputDir}/src/main/kotlin")
    }
}
השלב האחרון הוא להבטיח ש-task ה-clean וה-compileKotlin עובדים היטב עם ה-tasks החדשים. ניצור task חדש בשם cleanGeneratedCodeTask שימחק את כל הקוד שנוצר בכל פעם שה-task clean רץ. בנוסף, נרצה להבטיח שכל tasks ייצור הקוד הוצאו לפועל לפני שנבנה את הקוד שלנו.
tasks {
    register("cleanGeneratedCodeTask") {
        description = "Removes generated Open API code"
        group = "openapi tools"

        doLast {
            logger.info("Cleaning up generated code")
            File(openApiGenerateOutputDir).deleteRecursively()
        }
    }

    clean {
        dependsOn("cleanGeneratedCodeTask")
        supportedApis.forEach { finalizedBy(it.taskName) }
    }

    compileKotlin {
        supportedApis.forEach { dependsOn(it.taskName) }
    }
}
כפי שניתן לראות, עכשיו כל ה-tasks שלנו זמינים לשימוש ב-Gradle:

הדבר האחרון שצריך לעשות הוא להוסיף כמה dependencies ל-build.gradle.kts שלנו כדי להבטיח שהקוד שלנו יכול להיקמפל.
dependencies {
    api("com.squareup.retrofit2:retrofit:$retrofitVersion")
    api("com.squareup.retrofit2:converter-jackson:$retrofitVersion")
    api("com.squareup.okhttp3:logging-interceptor:$okHttpVersion")
}
שימוש בקוד שנוצר
הגדרת Clients
נתחיל בהגדרת ה-OkHttp client שלנו. שימו לב שאני מגדיר את רמת ה-logger interceptor ל-BODY. זה נהדר לצורכי debugging, אבל לעולם לא להשתמש בזה בפרודקשן כי זה יתעד את כל גופי הבקשות והתשובות. זה עלול לחשוף מידע רגיש ב-logs. אם עדיין רוצים לתעד את גוף הבקשה/תשובה, צריך לבנות interceptor מותאם אישית.
private fun okHttpClient() =
    OkHttpClient
        .Builder()
        .addInterceptor(HttpLoggingInterceptor().apply { level = BODY })
        .build()
עכשיו נגדיר beans לשני ה-API clients שלנו. כדי לוודא שה-Jackson object mapper שמגיע מהקוד שנוצר מוגדר נכון, נזריק גם את רשימת ה-converter factories ל-beans:
@Bean
fun helloApiClient(
    converterFactories: List,
): HelloApi =
    ApiClient(
        baseUrl = helloServiceBaseURL,
        okHttpClientBuilder = okHttpClientBuilder(),
        converterFactories = converterFactories,
    ).createService(HelloApi::class.java)

    @Bean
    fun goodbyeApiClient(
        converterFactories: List,
    ): GoodbyeApi =
        ApiClient(
            baseUrl = goodbyeServiceBaseURL,
            okHttpClientBuilder = okHttpClientBuilder(),
            converterFactories = converterFactories,
        ).createService(GoodbyeApi::class.java)
ℹ️ לחלופין, אפשר להזריק את ה-object mapper מ-Spring context ישירות לתוך קונסטרקטור ה-ApiClient כ-serializerBuilder
אז קלאס ה-configuration הסופי שלנו ייראה כך:
@Configuration
class DomainGatewayConfig(
    @Value("\${hello-service.base-url}")
    private val helloServiceBaseURL: String,
    @Value("\${goodbye-service.base-url}")
    private val goodbyeServiceBaseURL: String,
) {
    private fun okHttpClientBuilder() =
        OkHttpClient
            .Builder()
            .addInterceptor(
                HttpLoggingInterceptor()
                    .apply { level = BODY },
            )

    @Bean
    fun helloApiClient(
        converterFactories: List,
    ): HelloApi =
        ApiClient(
            baseUrl = helloServiceBaseURL,
            okHttpClientBuilder = okHttpClientBuilder(),
            converterFactories = converterFactories,
        ).createService(HelloApi::class.java)

    @Bean
    fun goodbyeApiClient(
        converterFactories: List,
    ): GoodbyeApi =
        ApiClient(
            baseUrl = goodbyeServiceBaseURL,
            okHttpClientBuilder = okHttpClientBuilder(),
            converterFactories = converterFactories,
        ).createService(GoodbyeApi::class.java)
}
עכשיו אפשר לקרוא ל-endpoints שלנו באמצעות ה-clients כך:
helloApi.hello(name)
goodbyeApi.goodbye(name)
הגדרת ה-Domain Gateway
עכשיו נגדיר mapper מ-layer האובייקט של OpenAPI (network) ל-layer האובייקט של השירות (domain):
object HelloMapper {
    fun Response.toResponse(): ResponseEntity =
        HelloResponse(value = this.body()?.value ?: "Unknown")
            .let { ResponseEntity.ok(it) }
}

object GoodbyeMapper {
    fun Response.toResponse(): ResponseEntity =
        GoodbyeResponse(value = this.body()?.value ?: "Unknown")
            .let { ResponseEntity.ok(it) }
}
לבסוף, נגדיר את ה-REST controller שלנו. מימוש ה-domain gateway controller פשוט מאוד. הוא Spring @RestController שמממש interface נתון. הקוד שלנו ייראה כך:
@RestController
class DomainGatewayController(
    private val helloApi: HelloApi,
    private val goodbyeApi: GoodbyeApi,
) : GatewayApi {
    override suspend fun hello(name: String): ResponseEntity =
        helloApi.hello(name).toResponse()

    override suspend fun goodbye(name: String): ResponseEntity =
        goodbyeApi.goodbye(name).toResponse()
}
הגדרת שירותי Hello ו-Goodbye
השירותים במאמר הזה יממשו את אותו מבנה שמוצג במאמר How to Use OpenApi to Build a Robust RESTful API, לכן נדלג על המימוש עצמו. עיינו במאמר לפרטים נוספים. לחלופין, בקרו ב-GitHub repository של Hello Service ו-Goodbye Service.
לשלמות, נציג את המימוש של ה-HelloController שמממש את הקוד שנוצר על ידי OpenApi:
@RestController
class HelloController : HelloApi {
    override suspend fun hello(name: String): ResponseEntity =
        HelloResponse("Hello, $name!")
            .let { ResponseEntity.ok(it) }
}
הרצת הקוד
אחרי שמימשנו את כל 3 השירותים, אפשר לקרוא לכל אחד מהשירותים בנפרד, או לקרוא ל-combined API דרך ה-domain gateway שלנו. כפי שניתן לראות בהמחשה למטה:
לחלופין, אפשר להשתמש בספרייה springdoc לפרסום גרסת HTML של ה-spec שאפשר לתקשר איתה מהשירות שלכם, אבל זה סיפור למאמר אחר.
סיכום
במאמר הזה הסברתי את היתרונות של צבירת השירותים שלכם לתוך domain gateway. השתמשנו בכוח של OpenAPI כדי להבטיח את חוסן ה-API שלנו, גם פומבית (עבור הלקוחות שלנו) וגם פנימית (בין השירותים שלנו).
כל דוגמאות הקוד במאמר הזה זמינות ב-GitHub repository שלי: https://github.com/yonatankarp/domain-gateway-demo
מידע נוסף
- API Versioning with Kotlin and Spring Boot מאת Mariusz Sołtysiak: מאמר של עמית שלי על גרסאות API שמשמשות ב-domain gateway שלהם.
קרדיטים
- צילומים מאת Robert Lukeman, Lachlan Donald ו-Geranimo ב-Unsplash.